

[Dec-2025] Linux Foundation CKA Exam: Basic Questions With Answers
New 2025 Realistic Free Linux Foundation CKA Exam Dump Questions and Answer
The CKA program is an essential certification for anyone who works with Kubernetes. It provides a rigorous and comprehensive assessment of an individual's ability to work with Kubernetes in a production environment. Certified Kubernetes Administrator (CKA) Program Exam certification is widely recognized by employers, clients, and peers, and is an excellent way for individuals to demonstrate their skills and knowledge to potential employers. If you're interested in working with Kubernetes, the CKA program is an excellent way to validate your expertise and enhance your career prospects.
The CKA Program Certification Exam covers a wide range of topics related to Kubernetes. These topics include installation and configuration, networking, scheduling, security, storage, and troubleshooting. Candidates must have a deep understanding of these topics in order to pass the exam. They must also be able to perform common Kubernetes tasks quickly and accurately.
NEW QUESTION # 30
You have a deployment named 'wordpress-deployment' that runs a WordPress application. The deployment is configured to use a PersistentVolumeClaim (PVC) for its data storage. However, you need to change the access mode of the PVC to 'ReadWriteMany to allow multiple pods to share the same dat a. How would you modify the Deployment and PVC to achieve this?
Answer:
Explanation:
See the solution below with Step by Step Explanation.
Explanation:
Solution (Step by Step) :
1. Update the PVC Access Mode:
- Modify the access mode in the PersistentVolumeClaim YAML file to 'ReadWriteMany'.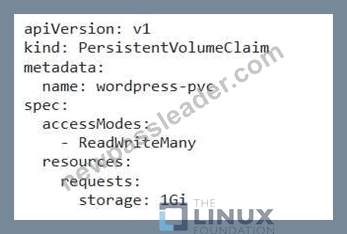
2. Update the Deployment: - Update the Deployment YAML to reflect the change in access mode: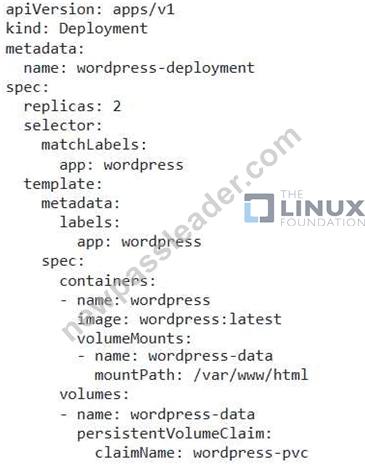
3. Apply the Changes: - Apply the updated PVC and Deployment YAML files using 'kubectl apply -f wordpress-pvc.yaml' and 'kubectl apply -f wordpress-deployment.yamr , respectively. 4. Verify the Changes: - Use 'kubectl describe pvc wordpress-pvc' to verify that the access mode has been updated to ReadWriteMany'. - Check the deployment status using 'kubectl get deployments wordpress-deployment' to confirm that the deployment is running with the updated PVC.
NEW QUESTION # 31
You have a Deployment named 'postgres-deployment' running a PostgreSQL database server. You need to configure the PostgreSQL server with a specific configuration file stored in a ConfigMap named postgres-config'. The configuration file includes sensitive information like the PostgreSQL superuser password. How can you securely store and mount this sensitive information without compromising security?
Answer:
Explanation:
See the solution below with Step by Step Explanation.
Explanation:
Solution (Step by Step) :
1. Create the ConfigMap:
- Create a ConfigMap named 'postgres-config' containing the PostgreSQL configuration file (e.g., postgresql.conf). This file will likely contain the superuser password as a plain-text value. Create the ConfigMap using 'kubectl create configmap' with the '--from-file' flag:
kubectl create configmap postgres-config --from-file=postgresql.conf
2. Use a Secret for Sensitive Data:
- Create a Secret named postgres-password' to securely store the PostgreSQL superuser password. Use
'kubectl create secret generic' with the '--from-literal' flag:
kubectl create secret generic postgres-password --from-literal=postgres-password="your_postgres_password"
3. Modify the ConfigMap:
- Update the 'postgres-config' ConfigMap by replacing the plain-text password in the 'postgresql.conf with a placeholder or environment variable reference. This prevents the password from being exposed in plain text in the ConfigMap:
kubectl patch configmap postgres-config -p '{"data": {"postgresql.conf": "password =
'$POSTGRES PASSWORD' "}}'
4. Configure the Deployment:
- Modify the 'postgres-deployment' Deployment to mount both the 'postgres-config' ConfigMap and 'postgres- password' Secret as volumes in the Pod template. Use 'volumeMounts' to specify the mount paths and 'volumes' to define the volume sources: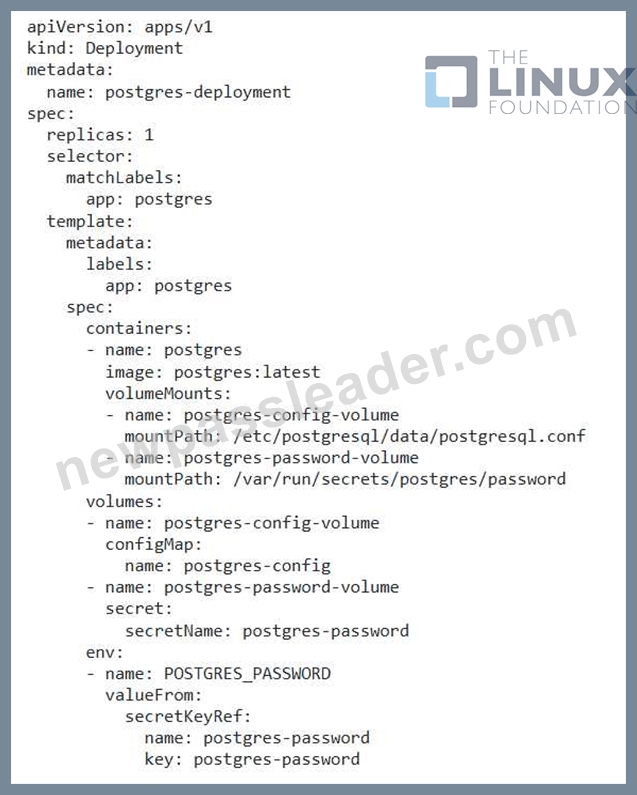
5. Apply the Changes: - Apply the modified Deployment YAML using 'kubectl apply -f postgres-deployment.yamr. 6. Verify the Configuration: - Verify that the PostgreSQL container is using the secure password from the Secret by connecting to the PostgreSQL instance and attempting to authenticate. ]
NEW QUESTION # 32
You must connect to the correct host.
Failure to do so may result in a zero score.
[candidate@base] $ ssh Cka000055
Task
Verify the cert-manager application which has been deployed to your cluster .
Using kubectl, create a list of all cert-manager Custom Resource Definitions (CRDs ) and save it to ~/resources.yaml .
You must use kubectl 's default output format.
Do not set an output format.
Failure to do so will result in a reduced score.
Using kubectl, extract the documentation for the subject specification field of the Certificate Custom Resource and save it to ~/subject.yaml.
Answer:
Explanation:
Task Summary
You need to:
* SSH into the correct node: cka000055
* Use kubectl to list all cert-manager CRDs, and save that list to ~/resources.yaml
* Do not use any output format flags like -o yaml
* Extract the documentation for the spec.subject field of the Certificate custom resource and save it to ~
/subject.yaml
Step-by-Step Instructions
Step 1: SSH into the node
ssh cka000055
Step 2: List cert-manager CRDs and save to a file
First, identify all cert-manager CRDs:
kubectl get crds | grep cert-manager
Then extract them without specifying an output format:
kubectl get crds | grep cert-manager | awk '{print $1}' | xargs kubectl get crd > ~/resources.yaml This saves the default kubectl get output to the required file without formatting flags.
Step 3: Get documentation for spec.subject in the Certificate CRD
Run the following command:
kubectl explain certificate.spec.subject > ~/subject.yaml
This extracts the field documentation and saves it to the specified file.
If you're not sure of the resource, verify it exists:
kubectl get crd certificates.cert-manager.io
Final Command Summary
ssh cka000055
kubectl get crds | grep cert-manager | awk '{print $1}' | xargs kubectl get crd > ~/resources.yaml kubectl explain certificate.spec.subject > ~/subject.yaml
NEW QUESTION # 33
You have a Kubernetes cluster with three nodes. Nodel and Node2 are in the 'default' availability zone, while Node3 is in the 'us-east-I a' availability zone. You want to ensure that pods are spread across all three nodes, considering the availability zones.
Describe how to configure the cluster to achieve this goal, specifically addressing how to leverage 'nodeSelector' and/or 'affinity' to enforce desired node placement. Explain the rationale behind your chosen approach.
Answer:
Explanation:
See the solution below with Step by Step Explanation.
Explanation:
Solution (Step by Step) :
Step 1: Configure Node Labels
Label each node with its corresponding availability zone:
For Node1 and Node2 (in 'default' availability zone):
kubectl label node availability-zone=default
For Node3 (in availability zone):
kubectl label node availability-zone=us-east-Ia
Step 2: Use Node Selector
Use 'nodeSelector' in your Deployment or Pod definition to specify the desired availability zone: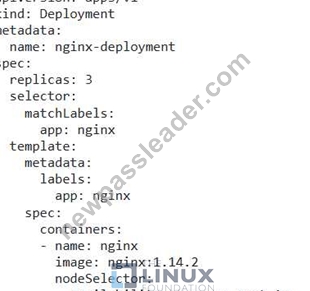
This ensures pods with the 'nginx-deployment' label will be scheduled only on Node3. Step 3: Use Affinity (Optional) You can also use 'affinity' for more fine-grained control. For example, to ensure that pods are spread across different availability zones: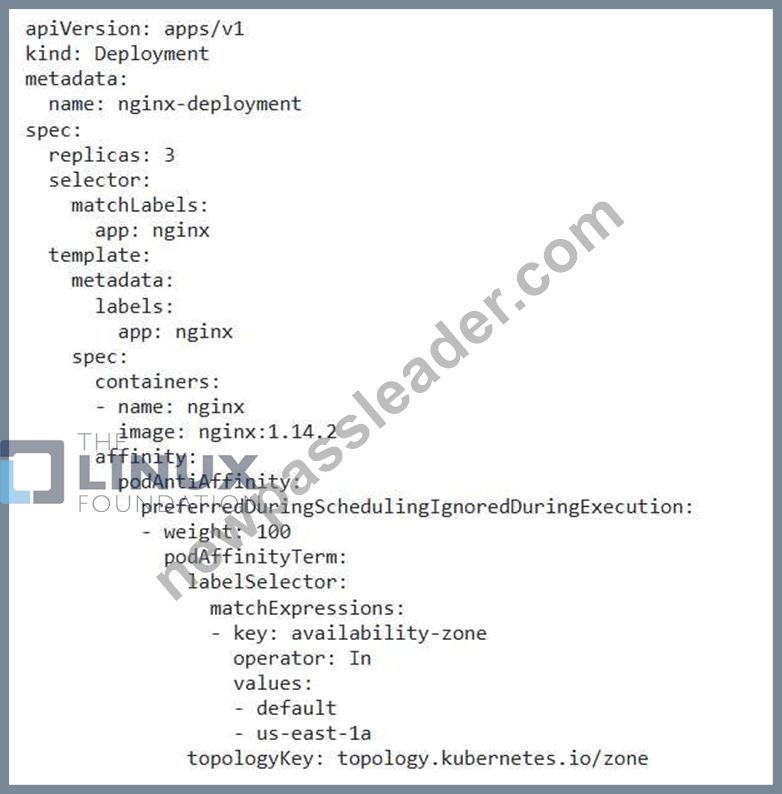
This configuration will prefer scheduling pods in different availability zones. Rationale: Node Selector: Provides a simple mechanism to direct pods to specific nodes based on labels. Affinity: Offers more advanced options, including 'podAntiAffinity" to spread pods across nodes (or availability zones) and 'podAffinity' to ensure pods are scheduled on the same node. Availability Zone: Distributes pods across different zones for high availability, as failures in one zone won't impact pods scheduled in other zones. ,
NEW QUESTION # 34
Score: 7%
Task
First, create a snapshot of the existing etcd instance running at https://127.0.0.1:2379, saving the snapshot to /srv/data/etcd-snapshot.db.
Next, restore an existing, previous snapshot located at /var/lib/backup/etcd-snapshot-previo us.db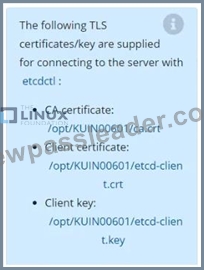
Answer:
Explanation:
Solution:
#backup
ETCDCTL_API=3 etcdctl --endpoints="https://127.0.0.1:2379" --cacert=/opt/KUIN000601/ca.crt --cert=/opt/KUIN000601/etcd-client.crt --key=/opt/KUIN000601/etcd-client.key snapshot save /etc/data/etcd-snapshot.db
#restore
ETCDCTL_API=3 etcdctl --endpoints="https://127.0.0.1:2379" --cacert=/opt/KUIN000601/ca.crt --cert=/opt/KUIN000601/etcd-client.crt --key=/opt/KUIN000601/etcd-client.key snapshot restore /var/lib/backup/etcd-snapshot-previoys.db
NEW QUESTION # 35
Create a PersistentVolumeClaim of at least 3Gi storage and access mode ReadWriteOnce and verify status is Bound
- A. vim task-pv-claim.yaml
apiVersion: v2
kind: PersistentVolumeClaim
metadata:
name: task-pv-claim
spec:
storageClassName: ""
accessModes:
- ReadWriteOnce
resources:
requests:
storage: 4Gi
kubectl apply -f task-pv-claim.yaml
//Verify
kubectl get pv
NAME CAPACITY ACCESS
MODES RECLAIM POLICY STATUS CLAIM
STORAGECLASS REASON AGE
task-pv-volume 4Gi RWO
Retain Bound default/task-pv-claim
6m16s
kubectl get pvc
NAME STATUS VOLUME
CAPACITY ACCESS MODES STORAGECLASS AGE
task-pv-claim Bound task-pv-volume
5Gi RWO 6s - B. vim task-pv-claim.yaml
apiVersion: v1
kind: PersistentVolumeClaim
metadata:
name: task-pv-claim
spec:
storageClassName: ""
accessModes:
- ReadWriteOnce
resources:
requests:
storage: 3Gi
kubectl apply -f task-pv-claim.yaml
//Verify
kubectl get pv
NAME CAPACITY ACCESS
MODES RECLAIM POLICY STATUS CLAIM
STORAGECLASS REASON AGE
task-pv-volume 5Gi RWO
Retain Bound default/task-pv-claim
6m16s
kubectl get pvc
NAME STATUS VOLUME
CAPACITY ACCESS MODES STORAGECLASS AGE
task-pv-claim Bound task-pv-volume
5Gi RWO 6s
Answer: B
NEW QUESTION # 36
You have two Kubernetes deployments running in different namespaces, 'namespace-A' and 'namespace-B'. You need to allow communication from pods in 'namespace-A' to a specific pod in namespace-B'. How can you achieve this using NetworkPolicies?
Answer:
Explanation:
See the solution below with Step by Step Explanation.
Explanation:
Solution (Step by Step) :
1 . Create a NetworkPolicy in namespace-R:
- Create a NetworkPolicy in 'namespace-R that allows traffic to the specific pod in 'namespace-B'.
- Code: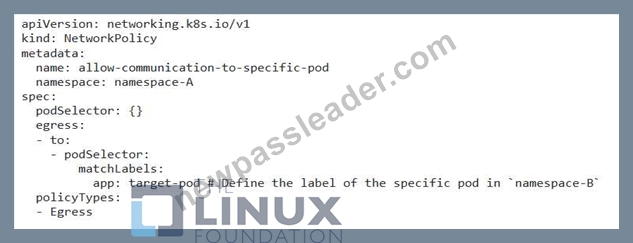
2. Ensure the Target Pod has the Correct Label: - Ensure that the specific pod in 'namespace-B' has the label 'app: target-pod'. 3. Apply the NetworkPolicy: - Apply the NetworkPolicy using 'kubectl apply -f networkpolicy.yaml' .,
NEW QUESTION # 37
Task Weight: 4%
Task
Scale the deployment webserver to 3 pods.
Answer:
Explanation:
Solution:
NEW QUESTION # 38
Set CPU and memory requests and limits for existing pod name
"nginx-prod".
Set requests for CPU and Memory as 100m and 256Mi respectively
Set limits for CPU and Memory as 200m and 512Mi respectively
- A. kubectl get po
kubectl set resources po nginx-prod --
limits=cpu=200m,memory=512Mi --requests=cpu=100m,memory=256Mi
//Verify
kubectl top po
kubectl describe po nginx-prod - B. kubectl get po
kubectl set resources po nginx-prod --
limits=cpu=200m,memory=512Mi --requests=cpu=100m,memory=256Mi
//Verify
kubectl describe po nginx-prod
Answer: A
NEW QUESTION # 39
You are running a MySQL database on a Kubernetes cluster. You want to ensure that your database data is persistent even if a pod is deleted or restarted. You need to create a PersistentVolumeClaim (PVC) to request a specific storage class with a 1 OGB capacity, access mode of 'ReadWriteOnce', and storage class of 'fast-storage'. Explain the configuration and how to create the PVC and then use the PVC to create a StatefulSet for your MySQL deployment.
Answer:
Explanation:
See the solution below with Step by Step Explanation.
Explanation:
Solution (Step by Step) :
1. Create a PersistentVolumeClaim:
- Create a YAML file named 'mysql-pvc.yaml' with the following content: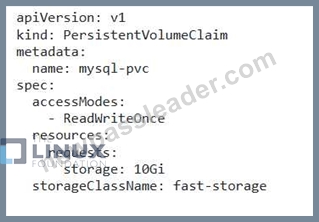
- Apply the YAML file using 'kubectl apply -f mysql-pvc.yamP. 2. Create a StatefulSet for MySQL Deployment: - Create a YAML file named 'mysql-statefulset.yaml' with the following content: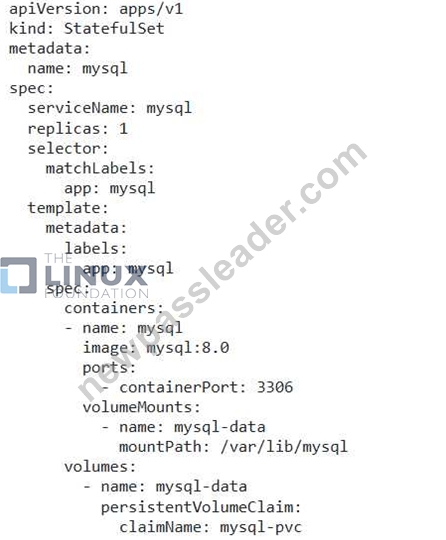
- Apply the YAML file using 'kubectl apply -f mysql-statefulset.yaml'. 3. Verify Deployment: - Check the status of the StatefulSet using 'kubectl get statefulsets mysql'. - Ensure that the pod is running and the PVC is mounted correctly. You can use 'kubectl describe pod mysql-0' to see the details of the pod and the mounted PVC.
NEW QUESTION # 40
Score: 7%
Task
First, create a snapshot of the existing etcd instance running at https://127.0.0.1:2379, saving the snapshot to
/srv/data/etcd-snapshot.db.
Next, restore an existing, previous snapshot located at /var/lib/backup/etcd-snapshot-previo us.db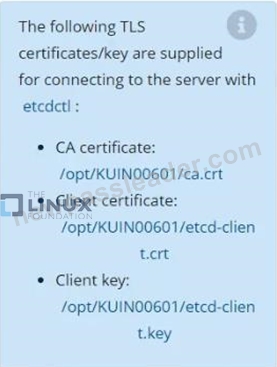
Answer:
Explanation:
See the solution below.
Explanation
Solution:
#backup
ETCDCTL_API=3 etcdctl --endpoints="https://127.0.0.1:2379" --cacert=/opt/KUIN000601/ca.crt
--cert=/opt/KUIN000601/etcd-client.crt --key=/opt/KUIN000601/etcd-client.key snapshot save
/etc/data/etcd-snapshot.db
#restore
ETCDCTL_API=3 etcdctl --endpoints="https://127.0.0.1:2379" --cacert=/opt/KUIN000601/ca.crt
--cert=/opt/KUIN000601/etcd-client.crt --key=/opt/KUIN000601/etcd-client.key snapshot restore
/var/lib/backup/etcd-snapshot-previoys.db
NEW QUESTION # 41
Configure the kubelet systemd- managed service, on the node labelled with name=wk8s-node-1, to launch a pod containing a single container of Image httpd named webtool automatically. Any spec files required should be placed in the /etc/kubernetes/manifests directory on the node.
You can ssh to the appropriate node using:
[student@node-1] $ ssh wk8s-node-1
You can assume elevated privileges on the node with the following command:
[student@wk8s-node-1] $ | sudo -i
Answer:
Explanation:
solution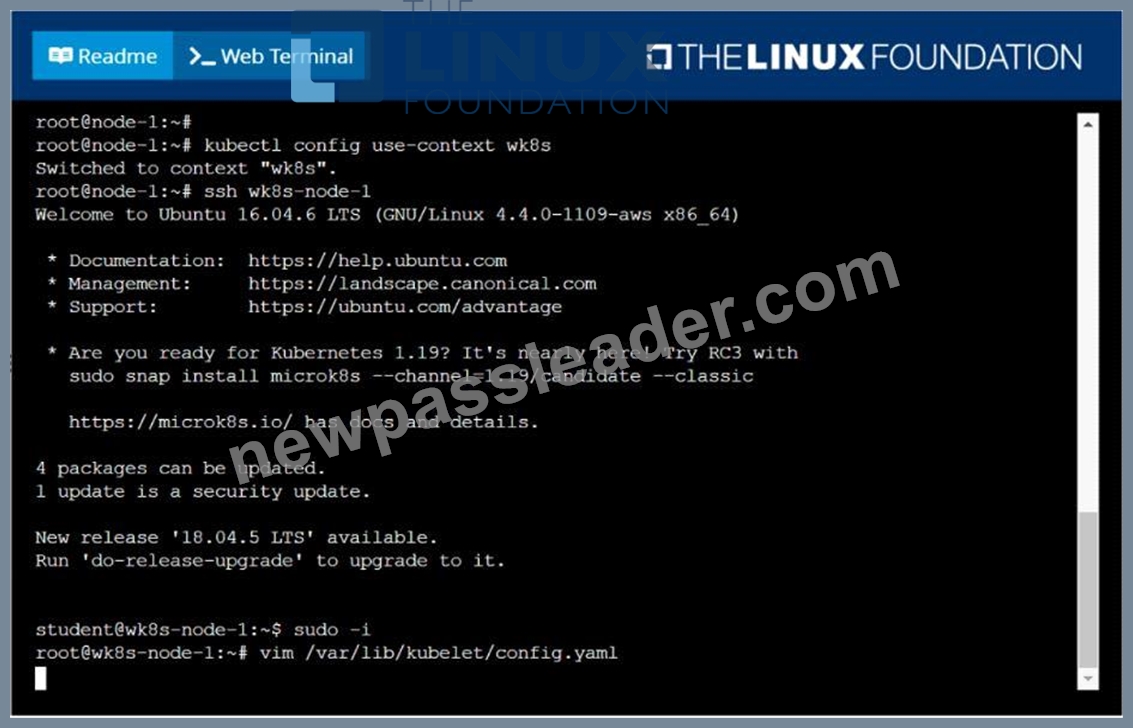
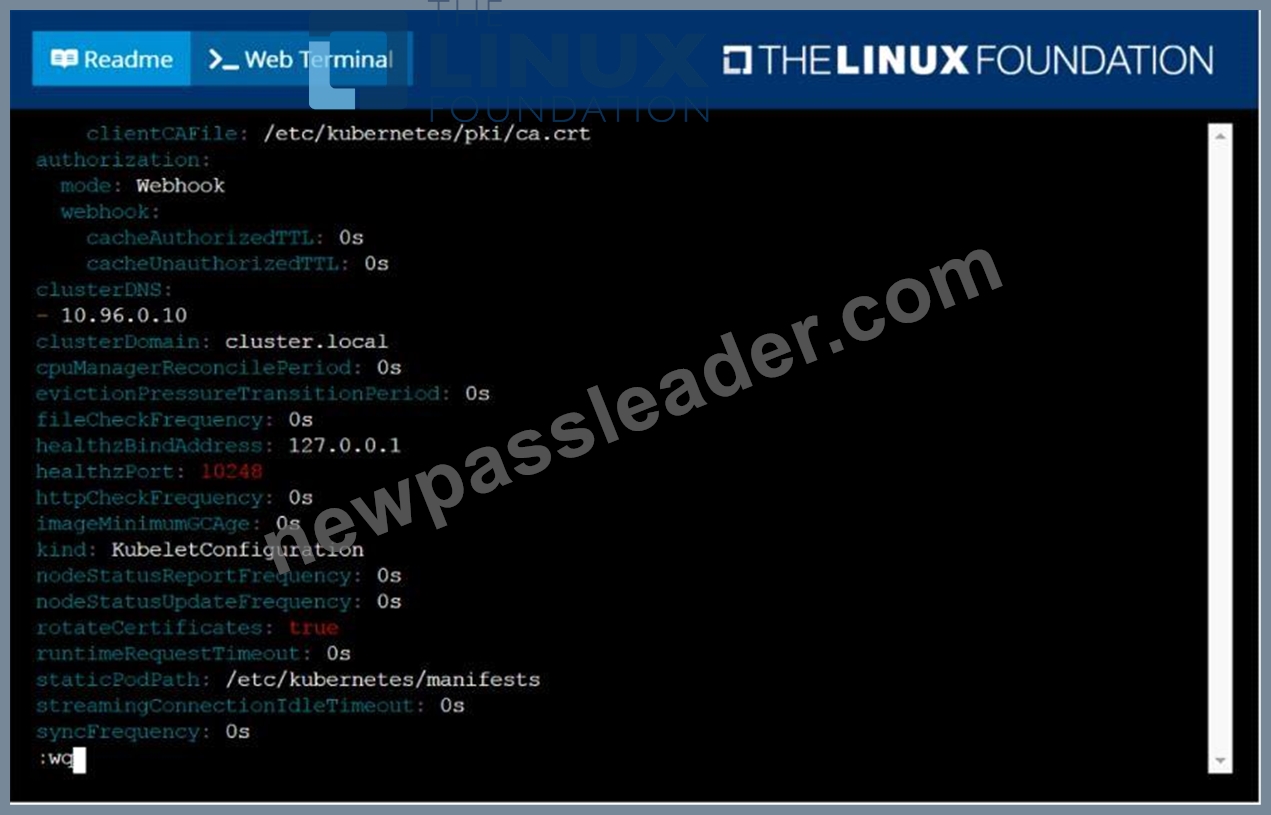
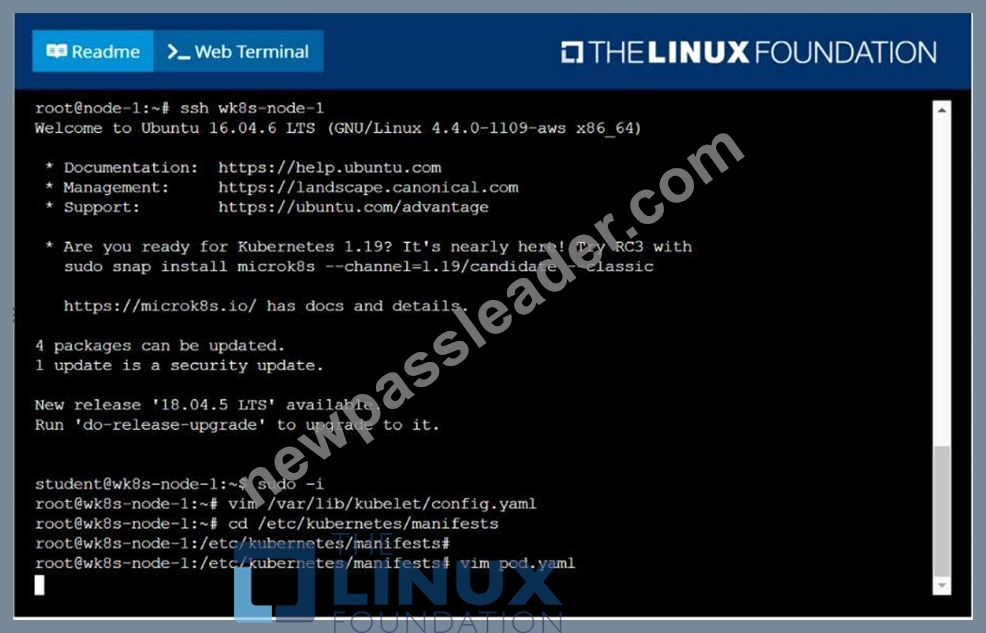
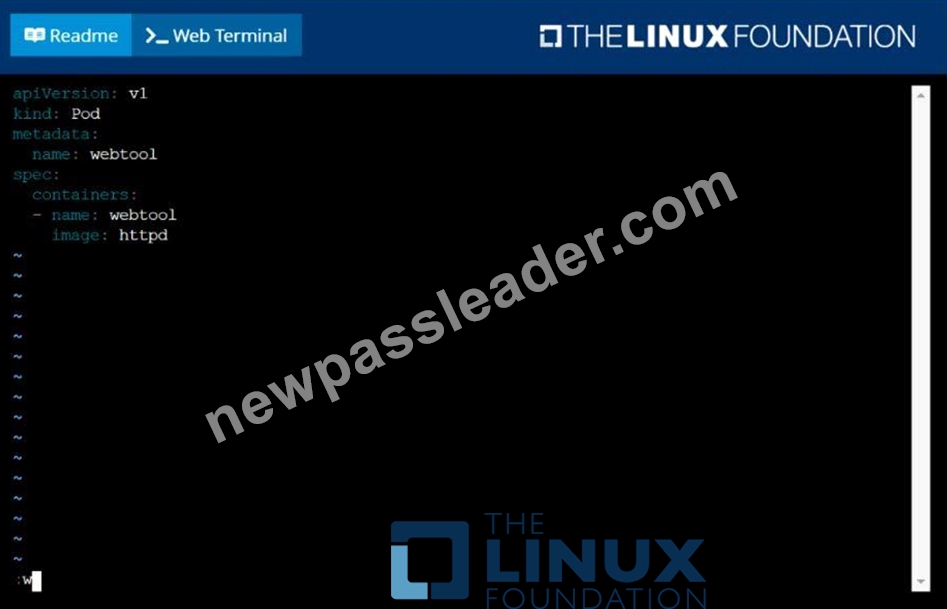
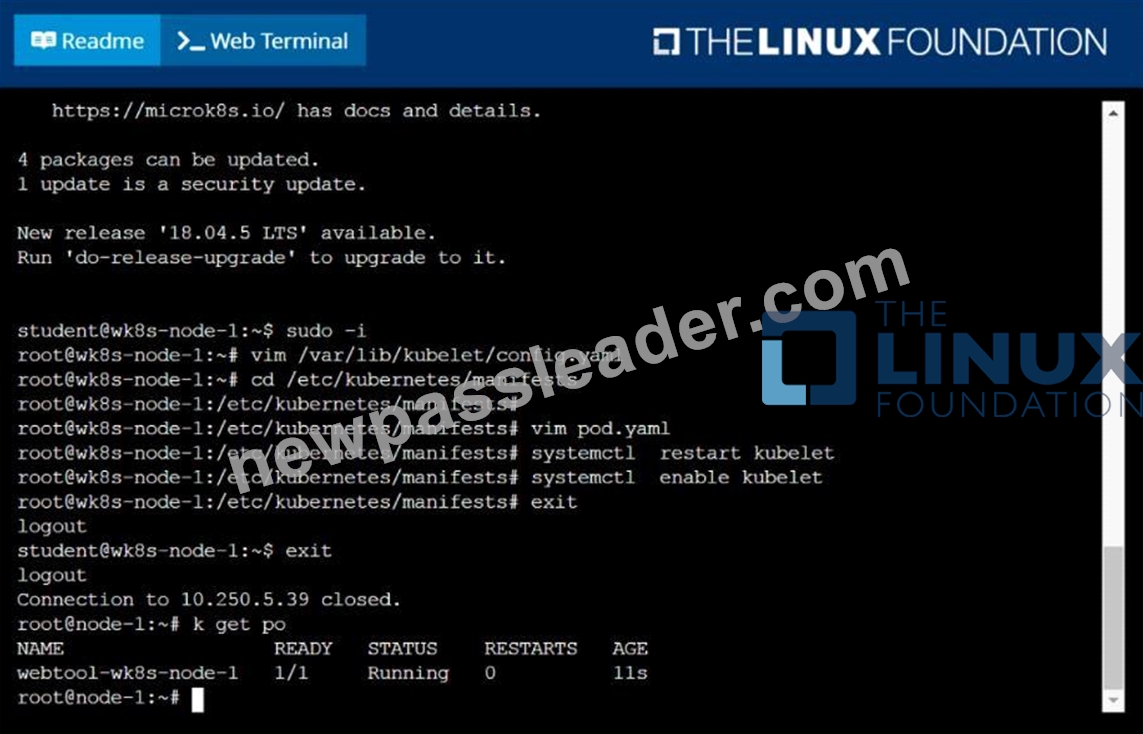
NEW QUESTION # 42
Task Weight: 4%
Task
Schedule a Pod as follows:
* Name: kucc1
* App Containers: 2
* Container Name/Images:
o nginx
o consul
Answer:
Explanation:
Solution:
Graphical user interface, text, application Description automatically generated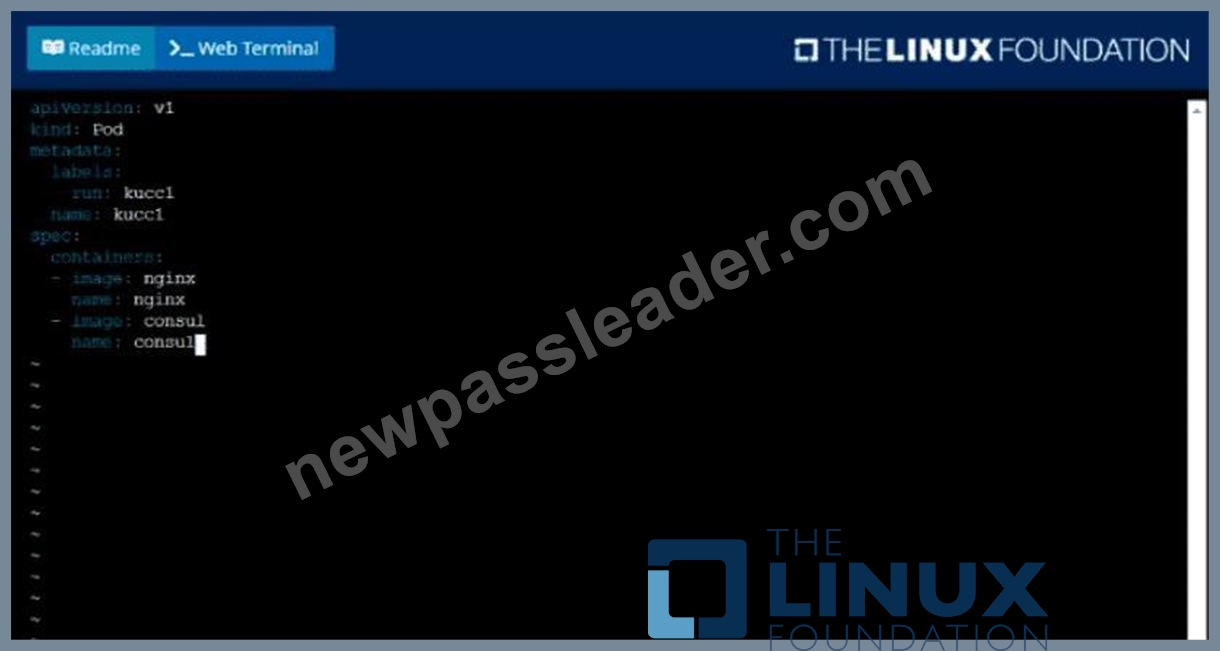
Text Description automatically generated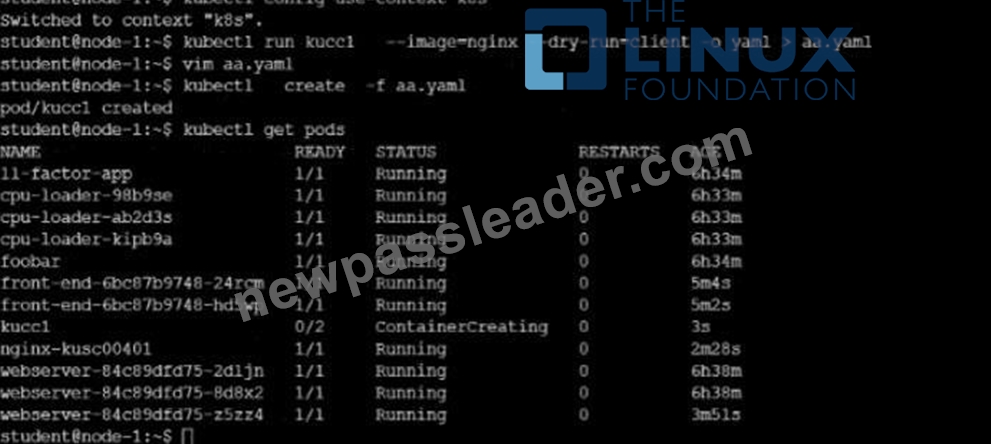
NEW QUESTION # 43
From the pod labelname=cpu-utilizer, find podsrunning high CPU workloads and write the name of the pod consumingmost CPU to thefile/opt/KUTR00102/KUTR00102.txt(which already exists).
Answer:
Explanation:
See the solution below.
Explanation
solution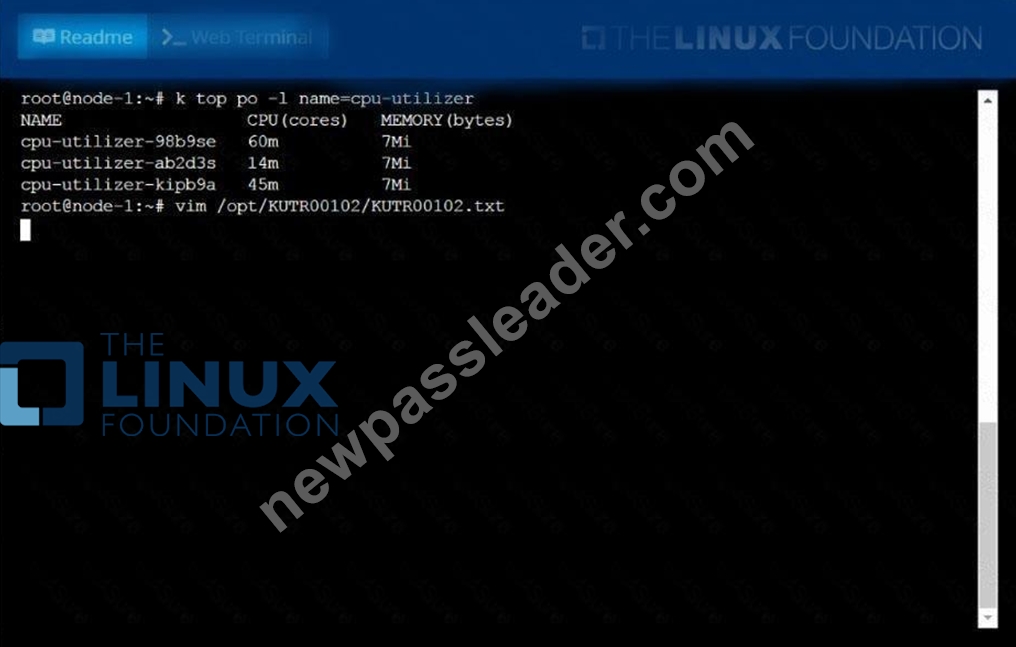
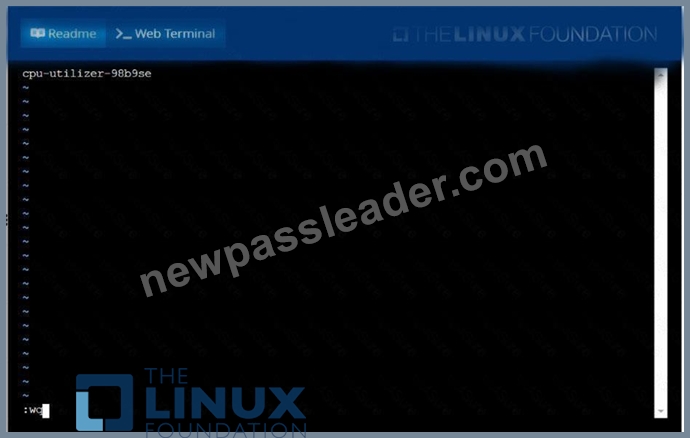
NEW QUESTION # 44
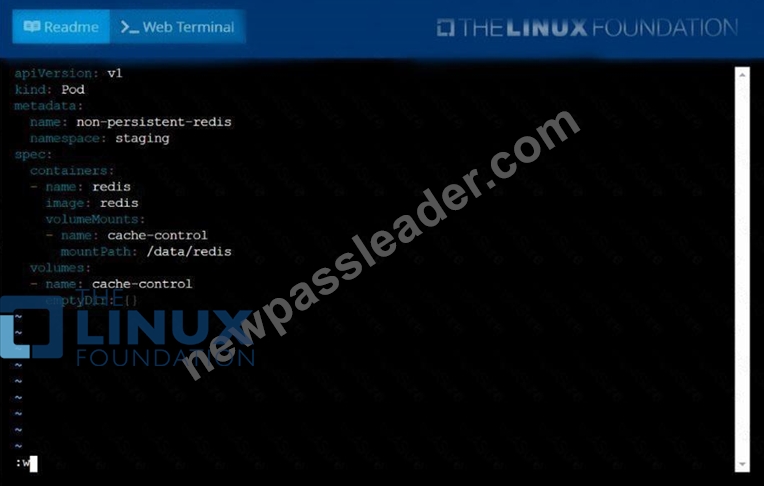
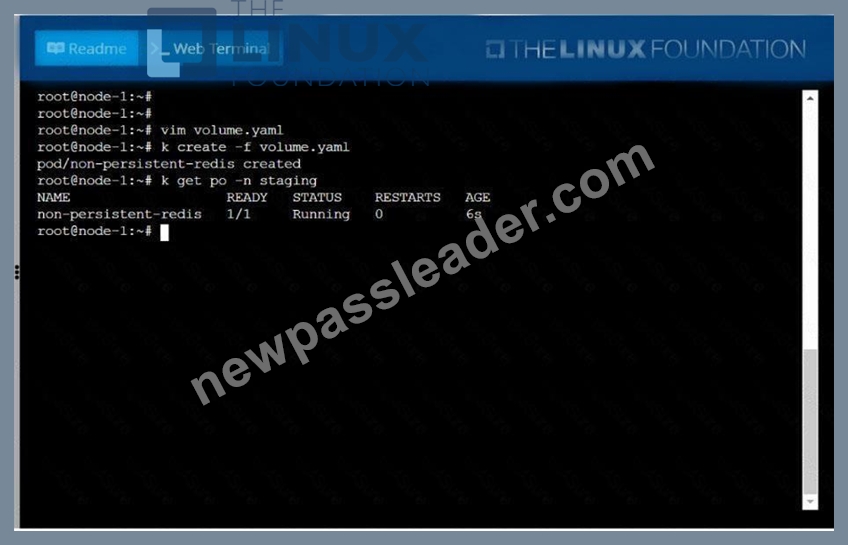
Create a pod as follows:
* Name: non-persistent-redis
* container Image: redis
* Volume with name: cache-control
* Mount path: /data/redis
The pod should launch in the staging namespace and the volume must not be persistent.
Answer:
Explanation:
See the solution below.
Explanation
solution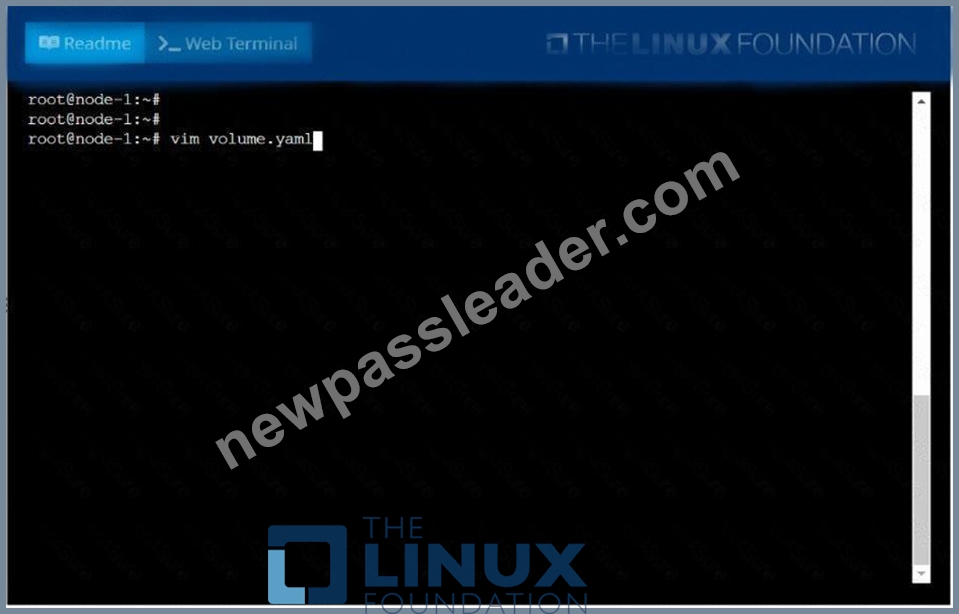
NEW QUESTION # 45
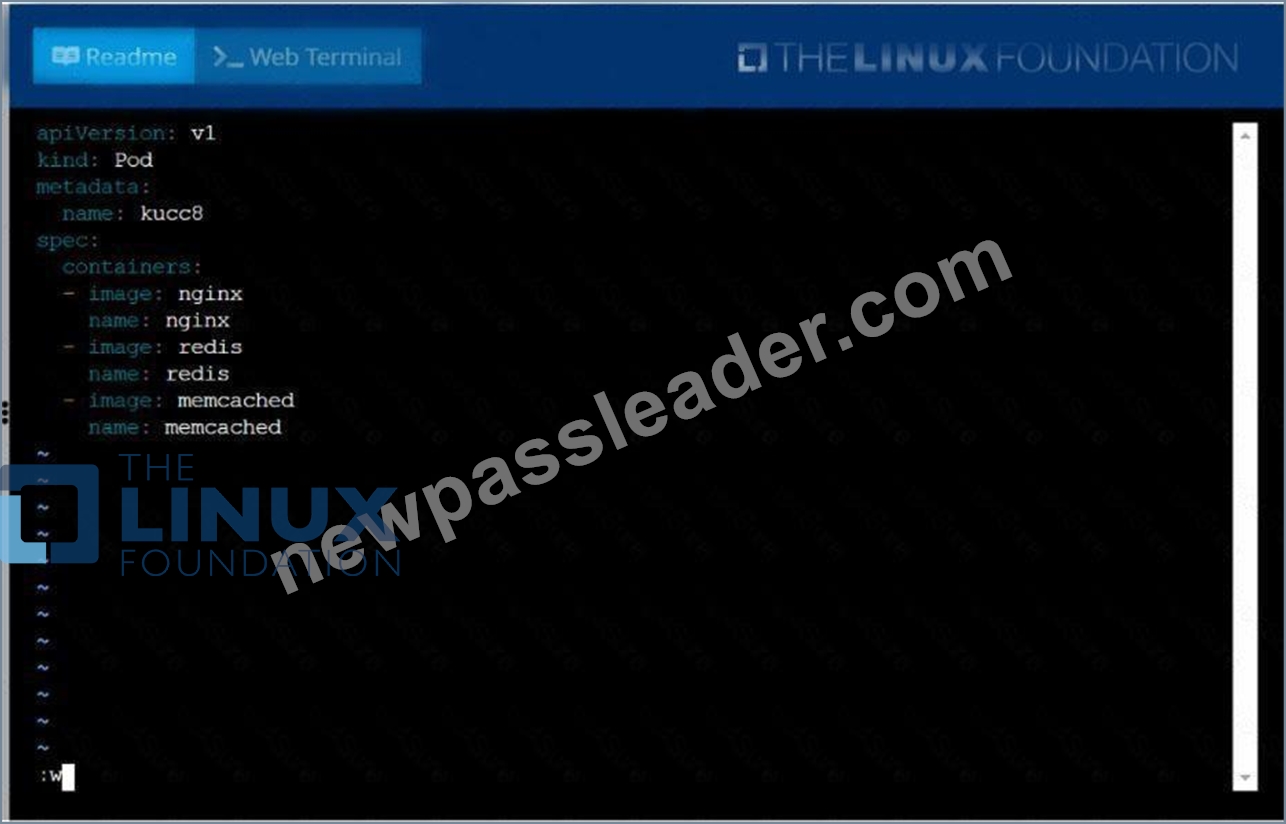
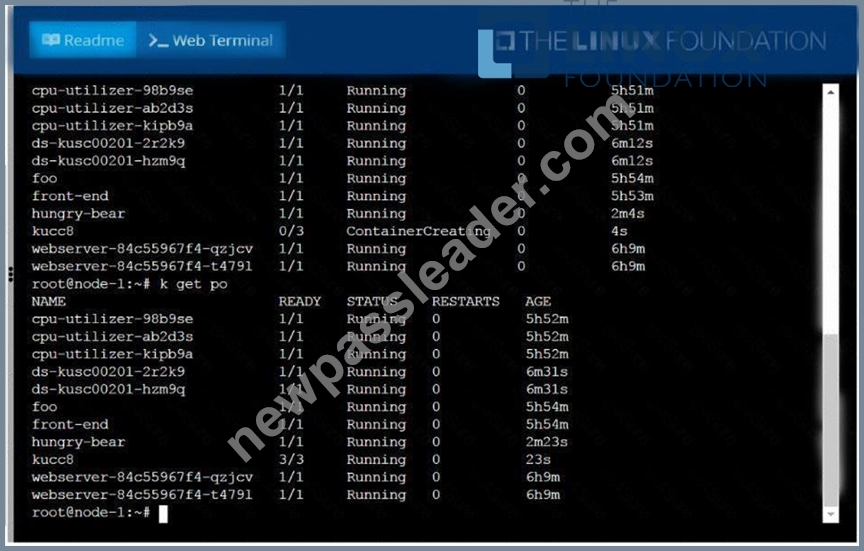
Create a pod named kucc8 with a single app container for each of the
following images running inside (there may be between 1 and 4 images specified):
nginx + redis + memcached.
Answer:
Explanation:
See the solution below.
Explanation
solution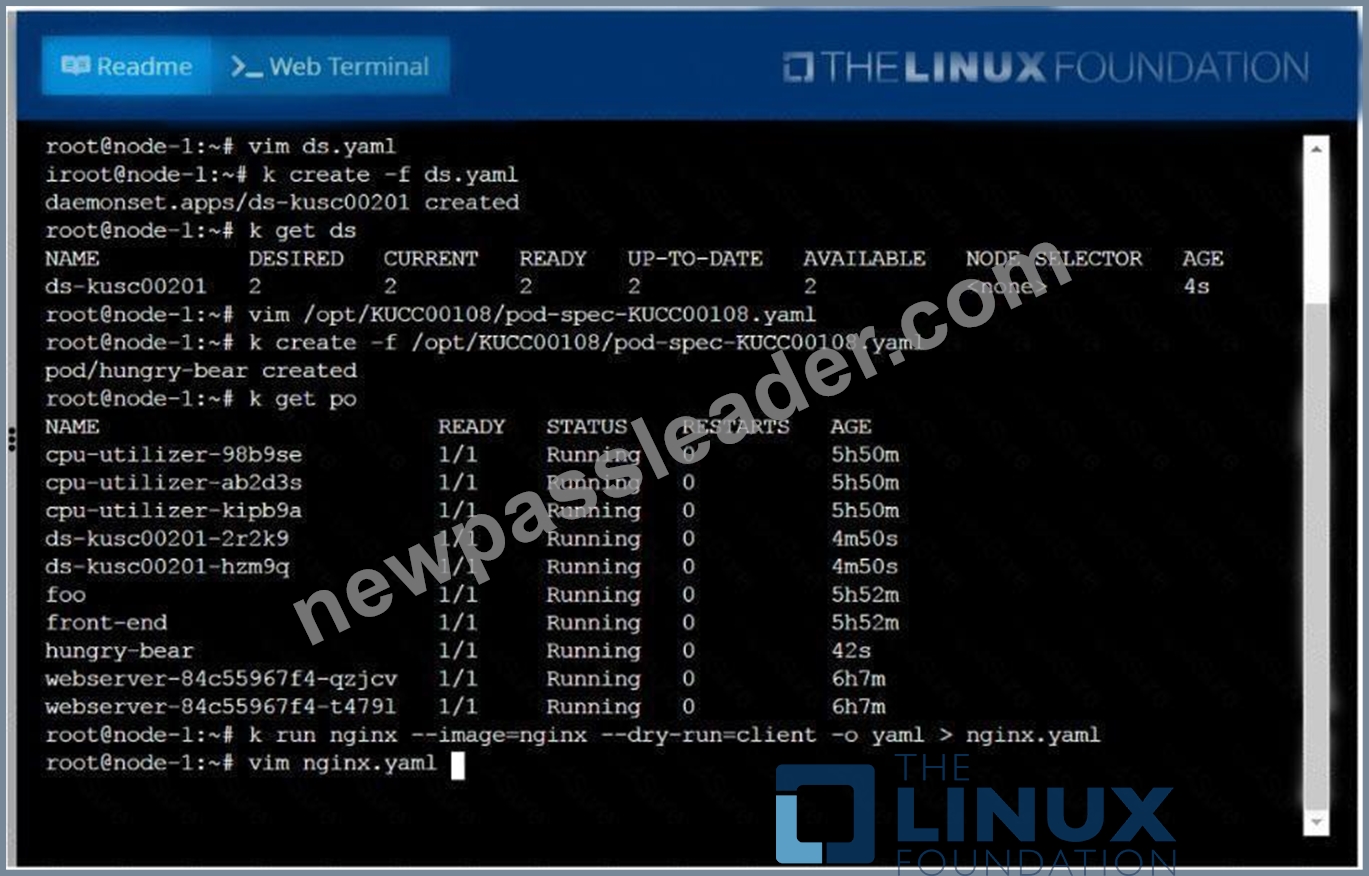
NEW QUESTION # 46
Score: 5%
Task
Monitor the logs of pod bar and:
* Extract log lines corresponding to error file-not-found
* Write them to /opt/KUTR00101/bar
Answer:
Explanation:
Solution:
kubectl logs bar | grep 'unable-to-access-website' > /opt/KUTR00101/bar cat /opt/KUTR00101/bar
NEW QUESTION # 47
Scale the deployment webserver to 6 pods.
Answer:
Explanation: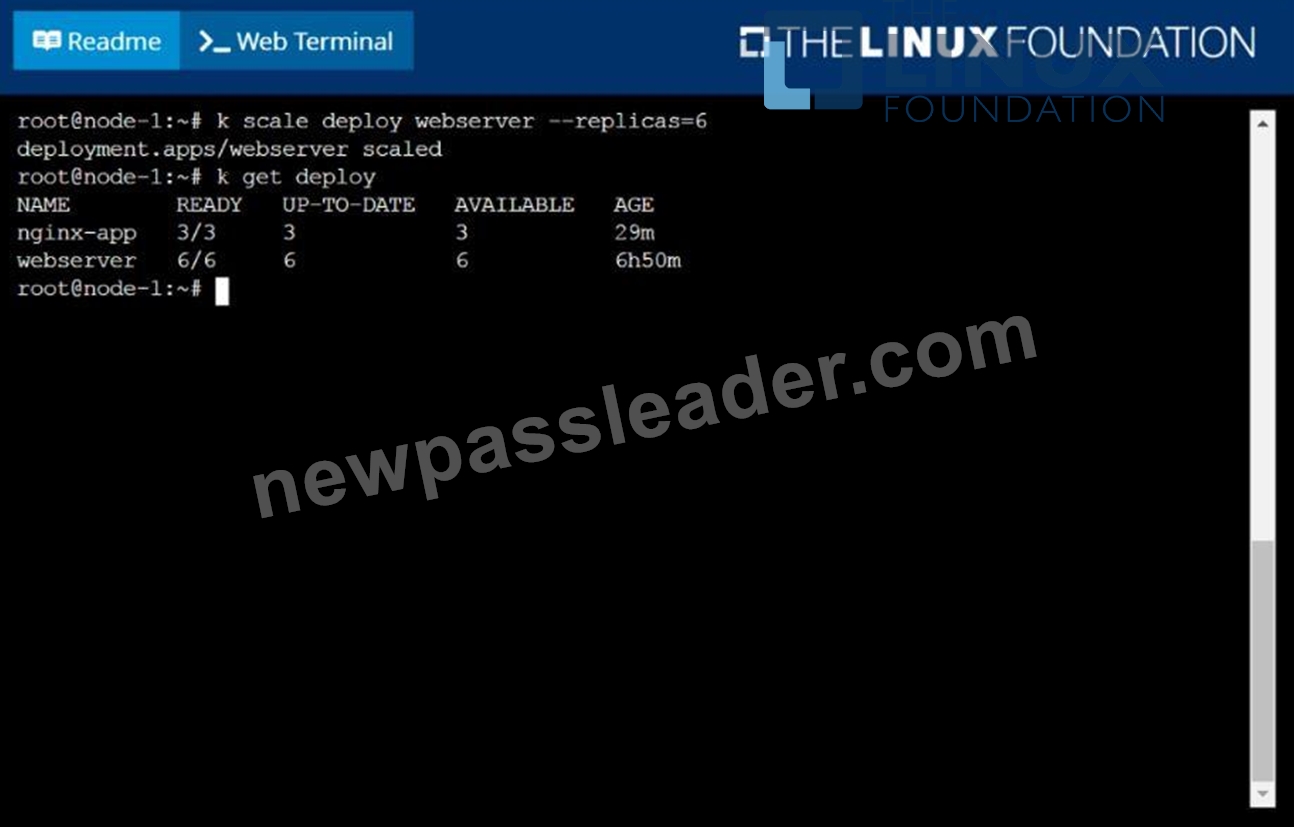
NEW QUESTION # 48
......
The CKA program is a hands-on certification program that assesses an individual's ability to perform tasks related to Kubernetes administration. The program covers a wide range of topics such as Kubernetes cluster architecture, installation, configuration, networking, security, storage, and troubleshooting. The program also requires individuals to demonstrate their ability to use Kubernetes command-line tools effectively.
Guaranteed Success in Kubernetes Administrator CKA Exam Dumps: https://www.newpassleader.com/Linux-Foundation/CKA-exam-preparation-materials.html
CKA Practice Test Engine: Try These 85 Exam Questions: https://drive.google.com/open?id=1sHwcfLiEgvWs69q0JdfuCyCEFj01ZTid